In this article, I’ll show you how to create a system that will automatically regulate the brightness of your lamps to keep the light level on the light sensor (more or less) equal to the setpoint that you can set.
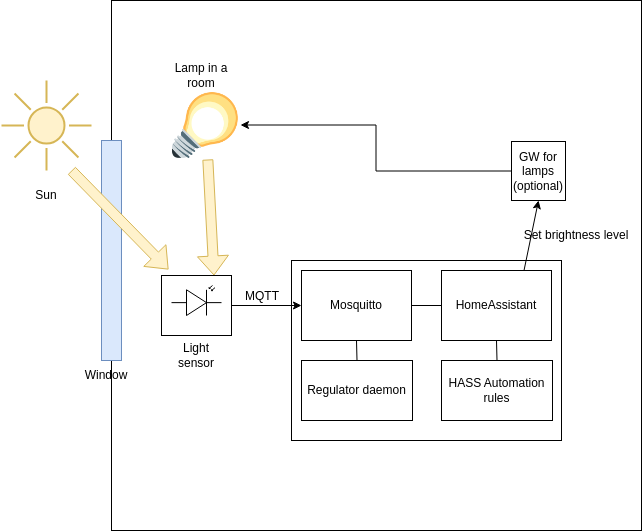
The autobright software will control the lamp(s) brightness in order to keep the light level on the sensor equal to the setpoint. That light level is affected by external lighting, it is affected by the time of the dat, clouts, solar eclipses, etc. In case of increasing external light, this software will automatically decrease brightness of the lamps, and vice versa.
Prerequisites.
To make such system, you’ll need:
– an existing Homeassistant installation on a systemd-based Linux distro (Ubuntu, Debian, and many other distros will fit).
– lamps that can be controlled from your Homeasstant.
– Light sensor. Here I’ll use a Lenovo Thinkpad 2 tablet as a light sensor, but you can make your own one with ESP32 and photoresistor/photodiode.
Installation.
First, prepare the light sensor. I’ll use a Lenovo tablet for that, here is the software for forwarding data from Lenovo tablet’s light sensor to the MQTT, please follow the installation instructions: https://codeberg.org/DSysoletin/lightmeter/src/branch/main/README.md
Now, let’s create a HomeAsisstant automation rules and control elements.
– Add to the confiruration.yaml of HomeAssistant the following section:
#-----------------------------------------------------
#External dynamic lighting stuff
input_number:
  slider1:
    name: DynLight_Setpoint
    initial: 1
    min: 0
    max: 1024
    step: 1
  slider2:
    name: DynLight_Output
    initial: 1
    min: 0
    max: 255
    step: 1

input_boolean:
  reg01_enable:
    name: Enable or disable auto light regulator (reg01)
Here we created two sliders and one boolean switch.
The boolean switch is used to turn automatic regulation on or off.
First slider is used to control the setpoint, you can set desired brightness of the lighting by moving that slider, and the second one is technical, it is needed to connect MQTT output of the regulator with the physical lamps.
Now, we need to create 3 automation rules:
First rule will forward the setpoint to lamps. Create a rule with trigger “state”, two conditions “state” and action “call service”. After creation, switch to text editor and enter the following text to automation:
Here is the automation text for first rule (forward brightness to the lamp):
Trigger:
platform: state
entity_id:
  - input_number.slider2
Conditions:
condition: state
entity_id: light.tradfri_bulb
state: "on"
condition: state
entity_id: input_boolean.reg01_enable
state: "on"Action:
service: light.turn_on
target:
  entity_id: light.tradfri_bulb
data:
  brightness: "{{ trigger.to_state.state | int }}"
Make sure that you have the correct lamp name in the “conditions” and “action” sections. The idea is – to set brightness only on the lamp that is turned on now – to avoid unwanted turning on of the lamps, so we need to check the status of the lamp in the conditions. And in the “action” section we need to specify, to which lamp(s) we need to forward the brightness value.
Now, let’s set a rule that will connect a regulator output (we will install the regulator software a bit later) to the slider in HomeAssistant control panel.
Here is the automation rule text:
Conditions – when MQTT message received:
platform: mqtt
topic: autobright/reg01_out
Action: call service
service: input_number.set_value
target:
  entity_id: input_number.slider2
data:
  value: "{{ trigger.payload }}"
Mare sure to remember topic we used here (autobright/reg01_out) – we will need to set it in the regulator’s config later.
Now, let’s create the latest automation rule to forward the setpoint to the regulator:
Condition (state changes):
platform: state
entity_id: input_number.slider1
Action (MQTT publish):
service: mqtt.publish
data:
  topic: autobright/reg01_sp
  retain: true
  payload: "{{ states('input_number.slider1') | int }}"
That’s it with the automation rules. Please restart your HomeAssistant to apply the changes.
Now, we need to install the regulator software itself.
Please download and install the regulator from here: https://codeberg.org/DSysoletin/autobright
Make sure to enter the correct topic names (ones that you entered in automation rules and ones that you have in your light sensor settings) into the autobright daemon config file. After starting Autobright service, the selected lamp(s) brightness will be controlled automatically.